Tampilan : Daftar Grid
Showing posts with label blog. Show all posts

Best 10 LinkedIn WordPress Plugins to Consider


There are a number of LinkedIn WordPress plugins available for your site that allow you to connect your readers to your LinkedIn profile.
Some of the plugins we found allow you to connect readers to your personal profile page and to your recommendations. Some even allow you to connect readers to your LinkedIn company profile pages and the products or services you offer. Some allow you to share content from your WordPress sites with your LinkedIn community
Below are some you should find useful.

WP LinkedIn
This plugin for WordPress allows you to embed your LinkedIn profile in several locations across your sites. There are embeds within the plugin that also allow you to embed your LinkedIn recommendations in various places on WordPress. The plugin is capable of embedding your LinkedIn profile at the bottom of your posts, or a LinkedIn badge that displays your name and company. There is also a recommendations scroll that can be embedded on your WordPress sites.
This is a free plugin. Installing the plugin requires uploading its folder to your WordPress plugins folder and activating it through your dashboard.
FB LinkedIn Resume
This LinkedIn WordPress plugin allows you to publish your entire LinkedIn profile onto your site. It also allows you to pick and choose which elements of your profile you’d like to share with your WordPress site visitors.
Installing the plugin for your site only requires you to download and install it on your WordPress site. The options for FB LinkedIn Resume can also be altered. When that’s finished, you receive shortcodes to place around your WordPress sites, such as in your widget sidebars.
LinkedIn Profile Badge
This free LinkedIn plugin for WordPress is offered by Peadig Co-Founder Alex Moss. The plugin allows you to display a LinkedIn badge almost anywhere on WordPress.
The LinkedIn Profile Badge appears as a small rectangle with your LinkedIn profile picture thumbnail alongside your name, title and company, and a location. There is also a button inside the LinkedIn Profile Badge box that directs site readers to your full LinkedIn profile. The LinkedIn Profile Badge can be embedded into any post, page, or template, according to its download site.
LinkedIn Auto Publish
LinkedIn Auto Publish allows for posting to your social site directly from any WordPress site you own. According to the download site for the plugin, posts on your WordPress site can be published in myriad ways.
This plugin allows you to filter what posts actually get seen on your LinkedIn profile. Posts to your WordPress sites can be shared or filtered out based on categories to which they’re published.
LinkedIn Master
This plugin is available as a free or premium add-on. It allows you to publish both your personal and business LinkedIn profiles on any WordPress site.
The profile badges the plugin creates can be embedded onto any WordPress post or page. The badges can be displayed horizontally or vertically, depending on the template layout you use for your sites.
The premium version of this plugin starts at $25 for a single site and goes up to $69 for unlimited sites. The premium version allows you to embed LinkedIn Company Profiles and Company Insider widgets.
WP LinkedIn/BuddyStream Integration
This LinkedIn WordPress plugin allows you to integrate WP-LinkedIn and BuddyStream plugins to your WordPress sites. You can display more than one profile after the plugin is installed, according to the website.
The plugin can be activated from your WordPress dashboard after it’s installed to your site.
WP LinkedIn for Companies
This plugin from Vedovini allows you to embed your company profile and updates to your company’s LinkedIn profile to your WordPress sites.
Based on the plugin description, you will be able to display a company profile, a company card, updates from your business and even products or services that your business offers on any WordPress sites you manage. To display these add-ons, you need only insert a shortcode to your site.
There are also a few LinkedIn widgets that you can display on your sites courtesy of the plugin.
But these features come at a price. WP LinkedIn for Companies is a premium plugin and costs $30 for each individual site.
LinkedIn Plugin for WordPress
This plugin from Vedovini provides you with shortcodes to insert a full LinkedIn profile and a scroll with your recommendations from the social media site to your WordPress blogs.
The plugin can be displayed on any WordPress page or post.
It’s free plugin, and another similar plugin allows you to do the same for multiple authors on your WordPress sites.
WP LinkedIn Multi-Users
This plugin from Vedovini is an extension of the company’s WP-LinkedIn plugin already featured on this list.
But unlike that plugin, it will post profile information for multiple authors on your WordPress site. The plugin will recognize different authors and will post their LinkedIn profile information on pages and posts they write.
Using this LinkedIn WordPress plugin on a single site costs $50 for a one-year license.
WordPress Social Ring
This plugin allows you to place share buttons for all the major social media networks, including LinkedIn on your WordPress sites.
According to the download site, you’ll be able to display buttons from LinkedIn, StumbleUpon, Facebook, Twitter and Google+.
The plugin allows you to display these buttons on various areas of your WordPress sites, including the homepage, on posts, pages, category pages, and the archives. The buttons can be displayed above or below content depending on your preference.
LinkedIn Photo via Shutterstock
More in: LinkedIn, WordPress 
#A3

Seven Steps to Seo Mobile-Friendly WordPress Site


The number of mobile users is booming and there are no signs of a drop in this ratio in the near future. Mobile has become an essential platform for a number of business owners to showcase their product and services through a business application. These app-based services reach an extended audience and therefore it is more important than ever to let your website go mobile-friendly.
There are a majority of customers who pass their time merely on their smartphones. Having a mobile-responsive WordPress website can grab the attention of these customers towards your company’s app, which is ultimately a profit for the business. A website that takes much time to load over mobile devices gets impacted with a poor search rank; that’s because the latest mobile-friendly search update from Google prefers the websites that are responsive in nature and offers them better ranking than those that are not.
Developing a mobile-friendly website is profitable in a number of ways. Here is a detailed guide on how to optimize your WordPress website for mobile visitors.

  • 1. Find the right hosting plan.

Picking the right hosting plan is the foremost requirement that should be addressed when trying to optimize your WordPress website. For this purpose, choose a reliable hosting company. Make sure your website is not shared over a common server as it can slow down the loading speed. Thus, beware of cheap hosting plans and choose the services of a company that offers economical and quality hosting services. Ensure that the hired company is efficiently handling web traffic towards your site.

  • 2. Choose a fast WordPress theme.

Choosing a perfect WordPress theme for your responsive website should be a top priority. You need to look for themes that are lightweight and can upload easily over major browsers. Moreover, using a design that is not coded well and has excess images throughout the design can add weight to the web page that increases the load time. Therefore, it is recommended you choose a responsive design that could load equally over phones, laptops, and tablets.

  • 3. Make the content adaptive.

A responsive website requires adaptive content so that they can scale down perfectly to mobile devices. The content can be made adaptive by creating alternatives such as short titles. Moreover, content type such as infographics may prove to be meaningless content for mobile simply because of the size of the screen. In such cases, it is advised not to deliver the content at all. If you wish to add any content display, add the content carefully by making it short and catchy.

  • 4. Monitor your plugins.

The more plugins on your WordPress website, the more performance issues may occur. Thus, it is important to install the plugins after performing thorough research. A number of plugins can slow down the speed of a WordPress website, which is always a loss for the website owner. Plugins slow down the speed of the website because of the bad coding and installation of outdated versions.

  • 5. Optimize images for the website.

Having images throughout your website enable users to remain interested in the content. It keeps the content from looking dull and boring and helps to share the article more frequently. Make use of plugins to optimize images over the websites. It won’t hurt the speed of the website. Uploading the right plugin for image optimization purposes ensures that images will only be uploaded when the required area over the phone becomes visible to the users. It helps to reduce the page load time offering satisfied user experience.

  • 6. Install a theme-switcher.

A theme-switcher is important to install if you are not using a plugin to provide a theme. The level of control differs from plugin to plugin and therefore you need to pick something that suits well to all the platforms that are being targeted. It is recommended to choose “any mobile theme plugin” as it allows individual assignment to browse through a wide range of mobile devices and some tablets.

  • 7. Go through the testing phase.

After performing all the above-mentioned tasks, you then have to test the website for its performance. It is not wise to trust your code and responsive design without first testing everything; undergoing testing will help to ensure flawless performance. You can test the performance of your website by running it on several mobile devices. This will help you to notice the performance of the website and its appearance on different devices.

#A3

Building Custom Login and Registration Pages in WordPress

WordPress started life as a blog engine, web software for creating blogs. Over the years, it has evolved into a content management system (CMS), even though some developers might disagree on it being considered a CMS.
There’s a healthy disrespect for the WordPress default login and registration pages, because they live outside the website without conforming to the site design.
When it comes to creating a website for clients, you might want a more customized login page, so that it integrates nicely with the website design as a whole. There are also numerous plugins that extend WordPress where the registration and login pages are used by end users, not just site administrators.
A couple of developers have released several kinds of plugins for customizing the default login and registration forms in WordPress such as the Custom Login Page Customizer.
The gripe about the default account page is not primarily because it isn’t pretty, but because it doesn’t have a connection to the website look and feel.
A quick Google search on building custom registration and login pages for WordPress reveals tutorials geared towards advanced PHP/WordPress developers. This is ok if you’re experienced, but as someone that’s written a lot of developer tutorials, I know there’s also an audience that needs something a bit simpler.
In this tutorial, we’ll learn how to build custom WordPress login, registration and password reset pages with a plugin I’ve developed called ProfilePress, all without writing a single line of PHP code. Of course, if you’re a developer, you’re welcome to check out the code too.
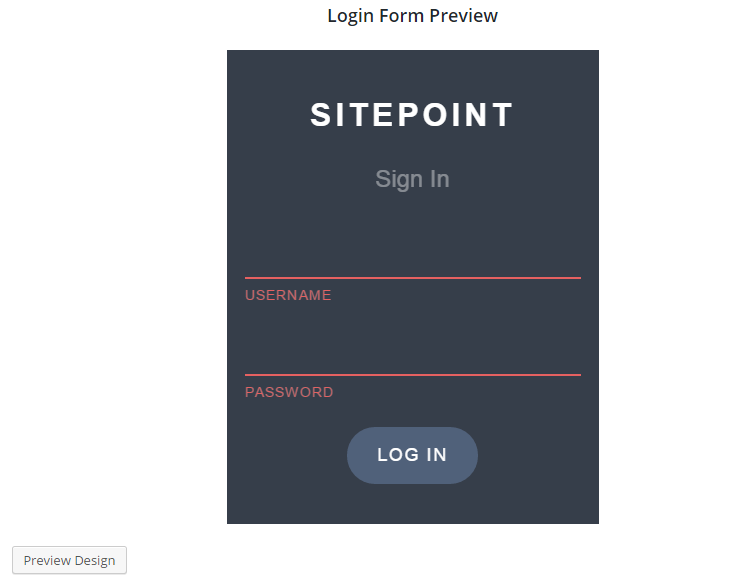
The form design below is what will be used in this tutorial.
See the Pen SP ProfilePress Login for WordPress by Agbonghama Collins (@collizo4sky) on CodePen.
See the Pen SP ProfilePress Registration for WordPress by Agbonghama Collins (@collizo4sky) on CodePen.
See the Pen SP Password Reset by Agbonghama Collins (@collizo4sky) on CodePen.
If you want to jump ahead of the tutorial, you can view a demo of the login, registration and password reset pages.
Introducing ProfilePress
ProfilePress is a WordPress plugin that makes building user account (login, registration, password reset, and edit profile) forms and front-end profile stupidly simple without having to code any PHP validation, authentication and authorization system on the server-side. It’s something I saw a need for, so I created it. It’s been an interesting project to work on, something I’ll share more about in future articles.
For a typical example, it can turn a simple HTML login form into a functional WordPress login without writing any PHP.
ProfilePress isn’t a drag-and-drop kind of plugin, rather it utilizes shortcodes as its templating system for building account forms and front-end profiles.
Shortcodes are to ProfilePress what Handlebars and Twig are to JavaScript and PHP respectively. You might already be familiar with shortcodes if you’ve used plugins such as Gravity Forms, Contact Form 7 or NextGEN Gallery. They’re very easy to use.
Without further ado, let’s get started with building the login, registration and password reset WordPress forms.
Custom Login Page
First off, install and activate the Lite version of ProfilePress plugin available for free in WordPress plugin directory.
Click the Login Form menu as shown in the image below and then the Add New button to begin the process.

A form will be presented to you. Fill the fields as follows.
Enter a name for the login form in the Template Name field.
Copy the codepen login form code above to the Login Design TinyMCE editor and then replace the text, password and submit input fields with their respective shortcode equivalents.
Here is the final HTML code for the login form.
<div class="sp-pp"> <div class="container"> <h1>SitePoint</h1> <h2>Sign In</h2> <fieldset class="form-fieldset ui-input __first"> [login-username id="username"] <label for="username"> <span data-text="Username">Username</span> </label> </fieldset> <fieldset class="form-fieldset ui-input __second"> [login-password id="password"] <label for="password"> <span data-text="Password">Password</span> </label> </fieldset> <div class="form-footer"> [login-submit class="btn" value="Log In"] </div> </div> </div>
Note: no form tag <form ..></form> is allowed. They are automatically added by the plugin when rendering the forms.
Paste the login CSS into the CSS Stylesheet text area.


Note: Errors generated by ProfilePress login forms are wrapped in a div with class profilepress-login-status, thus the presence of the class in the login stylesheet.
To see a preview of the login form, click the Preview Design button.


Finally, hit the Save Changes button to create the login form.

To make the login form available as a WordPress widget that can be dragged and dropped into a widgetized area / sidebar; check the Make this a Widget check box. After saving the changes, Go to the WordPress widget admin page, drag the ProfilePress Login Widget to a desired location and select the login form and save.

Navigate back to the login catalog, copy the generated login shortcode and paste it to the page you wish to make your custom login page.

Custom Registration Page
Building a custom registration form with ProfilePress follows pretty much the steps as a login form save for the form design and success message (text displayed on successful registration).

Click the Registration Form menu followed by the Add New button.

Copy the codepen registration form code above to Registration Design TinyMCE editor.

Replace the form components (username, password, email, first name, last name fields and submit button) with their respective ProfilePress shortcode equivalents.

The code for registration form will finally look like this:

<div class="sp-pp"> <div class="container"> <h1>SitePoint</h1> <h2>Create a new account</h2> <fieldset class="form-fieldset ui-input __first"> [reg-username id="username"] <label for="username"> <span data-text="Username">Username</span> </label> </fieldset> <fieldset class="form-fieldset ui-input __second"> [reg-email id="email"] <label for="email"> <span data-text="E-mail Address">E-mail Address</span> </label> </fieldset> <fieldset class="form-fieldset ui-input __third"> [reg-password id="password"] <label for="password"> <span data-text="Password">Password</span> </label> </fieldset> <fieldset class="form-fieldset ui-input __fourth"> [reg-first-name id="first-name"] <label for="first-name"> <span data-text="First Name">First Name</span> </label> </fieldset> <fieldset class="form-fieldset ui-input __fourth"> [reg-last-name id="last-name"] <label for="last-name"> <span data-text="Last Name">Last Name</span> </label> </fieldset> <div class="form-footer"> [reg-submit class="btn" value="Create Account"] </div> </div> </div>

Paste the registration CSS into the CSS Stylesheet text area.

Note: Errors generated by ProfilePress registration forms are wrapped in a div with class name profilepress-reg-status, hence the class in the style sheet.

Enter the code to display a customized message on successful user registration.

<div class="profilepress-reg-status">Registration Successful.</div>
There is also the option to make a registration form available as a widget, I’ve found this can be very useful.


Navigate back to the registration catalog, copy the generated shortcode and paste it to the page you wish to make your custom registration page.


Custom Password Reset Page
Go to the password reset settings page by clicking the Password Reset menu.
Click the Add New button at the top of the page to begin the form building process.
Copy the CodePen password reset form code above to the Password Reset Design TinyMCE editor.

Replace the username/email field and the submit button with their shortcode equivalents.

The final code for the password reset form will look like this:

<div class="sp-pp"> <div class="container"> <h1>SitePoint</h1> <h2>Reset Password</h2> <fieldset class="form-fieldset ui-input __first"> [user-login id="userlogin"] <label for="userlogin"> <span data-text="Username / Email">Username / Email</span> </label> </fieldset> <div class="form-footer"> [reset-submit class="btn" value="Reset"] </div> </div> </div>
Enter the code below into Message on successful password reset text area in order to display a customized message after users successfully use the form to reset their password.

<div class="profilepress-reset-status">Check your e-mail for further instruction.</div>
Save the changes and go back to the catalog.

Copy the generated shortcode and paste it to the page you wish to make your custom password page.

Redirecting the Default WordPress Account Pages to the Custom Alternatives
Finally, all we need to do now is redirect the default WordPress login, registration and password reset pages to their custom alternatives created with ProfilePress, so when users visit the following default URLs below, they will be redirected to the custom pages.

  • http://example.com/wp-login.php
  • http://example.com/wp-login.php?action=register
  • http://example.com/wp-login.php?action=lostpassword

To achieve this, click the settings plugin menu.

In the Global Settings section, select and save the custom login, registration and password reset pages.
Summary
In this tutorial, we learned how to easily build a custom login, registration and password reset page in WordPress using a plugin I’ve written called ProfilePress available in the WordPress Plugin Directory. We also learned how to redirect the default WordPress account pages to the custom account pages.
#A3

Improve your WordPress Theme Quality with VIP Scanner

Security is an important topic...

Security is everyone’s problem. In particular, if you’re a developer, you should take responsibility for things you create. Even if you’re just starting out as a WordPress user or developer, you should make sure that the sites you’re building for your clients are as secure as possible.
There is no such thing as absolute security.
To quote Bruce Schneier from his book “Applied Cryptography”:
The only secure computer system in the world is unplugged, locked in a vault at the bottom of the ocean and only one person knows the location and combination of that vault. And he is dead.
You’ve probably heard that even big companies like Facebook, Microsoft, Adobe and Google have had their share security problems. These companies have many developers and dedicated teams that only deal with security and things still go wrong.
I hope you haven’t forgotten the Sony incident with plain text passwords. If you’re developing anything, please don’t store passwords in plain text, just don’t.
Security and WordPress
There are many tools that can help you better harden your applications. Some of them are general, some very specific. Such tools exist for WordPress too. For a WordPress site, theme quality is a important part of your overall website security. One of the plugins that can help you in this area is VIP Scanner. The VIP Scanner plugin is a UI for VIP Scanner library. You can find the library in the plugins folder under vip-scanner.
My current local setup uses Vagrant with Chassis, take a look at this article on Chassis if you want to use it too.
There are two ways to install VIP Scanner. From the plugin page and by installing it manually with git in the plugins folder. The preferred way is to install it is via git. That’s because the VIP Scanner plugin page only has an older version ( v0.7 ) available, as opposed to the GitHub repo which is version v0.8. The developers of this plugin prefer the git way too. To install the plugin navigate inside plugin folder and execute:
git clone https://github.com/Automattic/vip-scanner.git vipscanner cd vipscanner git submodule update --init --recursive
The first command will download the plugin. The second will navigate into our newly cloned directory. The third will clone all the submodules (PHP-Parser).
Now, navigate to your WordPress dashboard and activate the plugin. To see this plugin in action, navigate on Tools > VIP Scanner.
There you will find 3 different types of scanning options:

  • Undefined function check
  • wp.com theme review
  • VIP theme review

  • When you first run a scan using this tool, it will use the current active theme – it’s worth mentioning that this tool only deals with themes. Each type of scan is different, this comes in handy when you develop WordPress themes and care about code quality (which everyone should).
    You can also use this tool with WP-CLI, you can check out the VIP Scanner docs for more information.
    When you scan a theme (the active theme), you’ll find all sort of problems. The first scan type (undefined function check) does what the name says. It scans the whole theme directory for undefined functions. This is the basic scan and you should use it on every theme that you develop. The other two are more specific. The second scan type (wp.com theme review) is used when you are developing themes for the community. The third scan is used only for WordPress VIP.
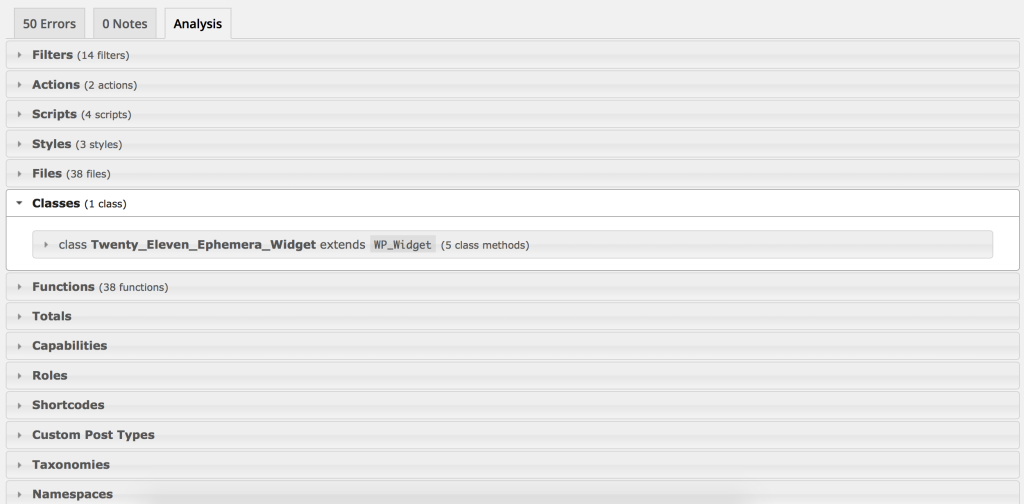
    So now we know a little bit about VIP Scanner, lets have some fun! Let’s scan the official themes that come preinstalled with WordPress (the latest theme). The first scan (undefined function) will not throw any errors. The second one will display some errors (mostly warnings). There are 3 sections for the scanning, Errors, Notes and Analysis. The first one is the section where errors will be shown, the second are warnings and the third is a nice way where we can find more information about the structure of the theme. Information like the number of classes, functions and author details.


    Even with the official WordPress themes, we found a few errors. Most of them are:
    The theme uses @package WordPress. This is reserved for WordPress Core files.
    This is because you are not supposed to use @package WordPress in any of your themes (despite being the official WordPress themes).
    Now go and scan a few more themes with this tool. This tool is very powerful when you’re developing your own themes (or even reviewing) for a client. If you’re writing your own themes, take small steps and then scan. This way you’re less likely to screw things up. Also you can find bugs in the early stages of development, which saves time.
    The Bad Parts
    One thing that I find very frustrating with WordPress in general is the lack of good quality code. VIP Scanner does its job very well, and from the commits, pull requests and issues it tells us that it’s under active development, which is great. What I’d like to see is the project using git submodules for dependency management. Packagist and Composer exist for that reason. PHP lacked dependency management tools, but they’re finally here. Also, I had a few problems with Code Sniffer. When scanning themes with the “VIP theme review”, I always got the error telling me I didn’t have Code Sniffer installed locally. I tried to work around this and install that tool, but I couldn’t get it to work. Please leave a comment if you figured this out.
    This tool does lack a few things, mostly code standards. But, it is a good tool and does its job very well, so you definitely should use it on every theme you develop.
    Conclusion
    In this article we saw what the VIP Scanner plugin is and how use it to better harden our sites. This is a nice plugin that can help you, not only for existing WordPress sites, but also assist you when you’re developing your own themes. Using this plugin you can speed up the development of your themes, knowing you’re building them with peace of mind. This is a kind of Unit Testing for WordPress themes, so you’ll know for sure that things are working the right way. Security comes from good practices and that will help you grow as a developer.
    What do you think about this plugin. Would you consider using it in your workflow? What other plugins are you using when creating themes to improve quality?


    #A3

    7 Smart Reasons Marketing Executives Use WordPress CMS for Corporate Websites

    Today i will show you the7 Smart Reasons Marketing 
    Executives Use WordPress CMS for Corporate Websites

    There are many reasons you should be using WordPress for your corporate website.
    This content management system, or CMS, is one that you can be happy with due to its popularity, extensibility and ease of use.
    Find a good website designer and hosting provider that lets you use this CMS ...and you will be very happy with the way your website turns out.
    #1 - It Is Very Easy To UseWordPress is not hard at all to install and make work for you. There are ample resources, including on the website for WordPress to teach you what it takes to utilize it. To make things even easier than you installing it yourself, you can find hosting companies that have the ability to do one click installs for you.
    If you still can't figure it out from there, many freelancers or SEO agencies that do web design would be happy to help you get started.
    Resources:wordpress.orgwpengine.comsiteground.combluehost.com
    #2 - The Variety of Great Plugins
    Plugins are software extensions that expand the functionality and feature set of WordPress. Not only do you a get the ability to make posts and pages after installing WordPress, you can also add functionality to do pretty much anything you need a website to do. Software integration to external systems can be added, for example a jobs/career section for your HR division.
    There are, for instance, plugins where you can add a cart to your website and sell any product or service you wish to. When you get a plugin, you can check into it and when it was last updated to get an idea of if it's still supported. There are ways to get into touch with developers in the event of a problem or if you have suggestions.
    Resources:WordPress Plugins DirectoryRecruiting Software APIWordPress Plugin Development
    #3 - Buying And Using Premium Themes Is Easy
    If you're going to be putting up a corporate website, or if you already have one, then you know that you can't copy anything anyone else has.
    For instance, if you were caught having a website that looked the same as a competitor, you could get into legal trouble. Plus, it's just not professional.
    Thankfully you don't have to stick with free themes or those that other companies use. You can find WordPress theme developers that offer fresh themes out of the box. And, you can have a custom one built and made new for an additional investment.
    Resources:ThemeforestElegant ThemesGenesis WordPress Framework
    #4 - WordPress Forums Offer Support
    WordPress is open source and has a community behind it that works on it day and night to make sure it keeps current with technological advances and demand. There are always people on the support forums for the website, and there are communities built around WordPress all over the Internet.
    When you are looking to get information about anything related to the WP CMS always try your best to search through the help files online and that came with your download. Then if it's unanswered, search to see if anyone has asked it before.
    Resources:WordPress SupportWordPress Website Building Steps
    #5 - Anything You Need To Know Is Online
    When it comes to working with a website for your corporation or one for others, you can basically find all the information you need about what you're doing online.
    It's so easy to get help with anything, like if you were to have a question about how to add a banner with a graphic on it to your page's header section so it showed up on every page, you could easily find out what to do.
    Just think about a short phrase about what you want to do and search for it like adding graphics to header of page.
    #6 - Software Updates Are Easy To Do Yourself or Via a Team
    Updates appear on your dashboard and they need to be taken care of so your site can be as safe as possible. When you see that WordPress has an update, that especially should be cared for right away as they probably discovered a security issue and patched it. It's also another opportunity to get new features as they are launched.
    Luckily, it just takes a click of a couple of buttons on the dashboard to do it. Look for symbols on your dashboard indicating updates and that should allow you to get them made without too much of an issue.
    #7 - Hiring People To Put Content Up Is Straightforward
    If you're a corporate business person, you probably don't have time to sit there and create content all day for your website.
    Instead, you can hire people to write it and then post it for you. Most people that do content development can use WordPress and do the work for you.
    There are also people and content companies you can get to write targeted content, and then you can copy and paste it to a post. Needless to say, it's a lot easier than having to learn to code and then getting into your website's source to alter it -- just to add content.
    Finally, leverage all your content in your WordPress website and push it out via social media marketing and SEO (search engine optimization).
    Resources:Problogger job boardBefore your hire content writersWordPress Social Media Marketing Secrets
    #A3

    Wordpress optimization tips and tricks


    In this post i will show you how to maximise the speed of your wordpress blog or website..
    The time it takes your website to load influences how successful it will be. If your website is slow, visitors will turn away in droves. They might even click the back button before your website loads.
    Website performance will also influence your rankings in search engines. In addition to being ranked higher, many website owners report seeing an increase in search engine spider crawling after speeding up their design.
    Today, I would like to share with you thirteen quick tips on how you can optimize your website and decrease page loading times. If you follow these techniques and best practices, your website will load much quicker.
    Before applying these techniques to your website, I encourage you to check the speed of your website using a free performance service such as GTMetrix, YSlow or Google PageSpeed Insights. These services will inform you of your page loading time and the overall file size of your page. They also offer tips


    1. Choose the Right Hosting Plan

    The first step in optimizing your website correctly is to choose the right hosting plan. You are fighting a losing battle if your server is taking an age to process HTTP requests and MySQL commands.
    Performance services such as GTMetrix will advise you of the exact response time of your server. I recommend testing the response time of your own website against similar websites. For example, if you run a photography blog, see how your server response time compares to other photography blogs within your niche.
    Hosting companies are not always the cause. You may be with a great hosting company but see poor response times because your chosen hosting plan is underpowered. Customers using shared hosting plans, for example, are more likely to face slow loading times as hundreds of websites are hosted on the same server.
    However, any type of hosting plan will suffer from insufficient RAM and CPU throttling. Therefore, you need to pay attention to what your website needs to run smoothly. Do not be a cheapskate and go for the cheapest option. Choose a hosting plan that can handle traffic spikes efficiently.

    2. Use a Fast WordPress Theme

    A design that has been coded badly, or uses images throughout the design, will add unnecessary weight to your page. It is not uncommon for some WordPress themes to be a few megabytes in size. Such a design could add a few seconds to your page loading time.
    Choose a design that has been optimized for desktops, tablets and mobile devices. Search engines favor responsive designs as they ensure all pages have the same URL, however adaptive designs that were created specifically for mobile phones can improve a mobile user’s experience considerably (it is not uncommon for an adaptive design to reduce page size by over one megabyte).
    Unfortunately, most theme developers optimize their theme demo website using caching and content delivery networks. This makes is difficult to know how quick a WordPress design is before using it yourself.

    3. Monitor Your Plugins

    Before you install any plugin on your website, ask yourself “Is this plugin necessary?”.
    Plugins are one of the biggest causes of WordPress websites being slow. The more plugins you install without research, the more likely you will face performance issues; however the sheer number of plugins you have installed is not the reason a WordPress website can slow down.
    Certain plugins are known for causing websites to be slow. There are many reasons for this including bad coding, calls to external servers and persistent calls and updating of your WordPress database. Pay close attention to how much CPU plugins use too. Many plugins can bottleneck your CPU due to persistent processes. If this happens, your whole server could go down.
    P3 Profiler
    The breakdown from P3 Profiler helps you see which plugins are slowing down your website.

    One plugin I highly recommend you use is P3 Profiler. Developed by GoDaddy, the plugin will show you exactly how much load time your plugins are adding. A breakdown is given which displays exactly how much load each plugin adds. It is the most effective way of seeing what plugins are slowing down your website.

    4. Empty Your Trash

    WordPress 2.9 introduced the WordPress trash system. Whenever content is deleted, be it a comment, post, page, media etc; it is sent to trash. From here, the content can either be restored or deleted permanently. It is effectively a fail-safe system that helps you recover anything that was deleted accidentally (in much the same way the recycling bin works in your computer).
    Trash can take up a lot of unnecessary room in your website’s database. The bigger the database, the longer it is to retrieve information from it.
    By default, WordPress will automatically delete trash after thirty days. This can be reduced by modifying the wp-config.php file. For example, you could reduce this to seven days by adding the following:
    define ('EMPTY_TRASH_DAYS', 7);
    You can completely disable the trash system by adding this to your wp-config.php file.
    define ('EMPTY_TRASH_DAYS', 0);

    5. Reduce Post Revisions, Drafts, Spam, Pingbacks and Trackbacks

    It is not just trash that can needlessly increase the size of your database. All post types populate table rows with data. Therefore, it is important to regularly delete spam comments and unwanted pingbacks and trackbacks.
    You should also be wary of the number of drafts and post revisions your website has stored. The WordPress revision system allows you to go back to older versions of articles, view them and restore them.
    In addition to one autosave of your posts and pages, revisions will be generated each time you save your articles. This means that an article with ten revisions with take up ten times as much room on your database than the actual article that was published. As you can imagine, this increases the size of your database considerably.
    Post Revisions
    Post revisions can greatly increase the size of your database.
    By default, WordPress will save an unlimited number of revisions, however this is generally not needed. It is better to reduce this limit to something more practical such as two or three. You can do this by adding the following code to your wp-config.php file:
    define( 'WP_POST_REVISIONS', 3 );
    Alternatively, you can completely disable the post revision system by adding the code below to your wp-config.php file. From a blogger’s perspective, this is not an optimal set up as post revisions are very useful, however many website owners have taken this step to ensure their database runs more efficiently.
    define( 'WP_POST_REVISIONS', false );
    A more practical way of cleaning your WordPress database is to use WP Optimize. The plugin can automatically remove auto-drafts, spam comments, trackbacks and more. WP-DBManager is also a good solution for optimizing your database.

    6. Optimize Your Images for the Web

    Images can help break up long pieces of text and can help your articles be shared more frequently on social media services; however they also take up a lot of storage. Therefore, pages that contain many images can take a long time to load.
    It is therefore in your best interests to optimise your images for the internet before you upload them to your website. Most photo editing applications, such as Photoshop, allow you to do this via the “Save for Web” option.
    A good plugin to optimize images that have already been uploaded is WP Smush.it. It utitlizes the Smush.it API to optimize JPEG images, strip meta data from JPEGs and convert GIF images to PNG. You should however be aware that the plugin uses up a lot of resources when it is converting images, therefore your website may be slow whilst it is running.
    If you do not want to sacrifice image quality, check out Lazy Load. The plugin ensures that images are only loaded when the area becomes visible to the user. This will greatly reduce page loading times.

    7. Choose Your Advertisements Wisely

    Be conscious about the type of advertisements you add to your website. The most efficient way of promoting a product or service on your website (from a website performance perspective) is to link directly to the page using an image that has been optimized for the web. You can take this one step further and link using text links instead.
    Adding advertisements from third-party advertising networks can increase loading times due to the calls that are made to external servers. Even localised ad tracking scripts can hurt performance. For example, the popular ad rotation plugin OIO publisher has a bad reputation for increasing page loading times.
    Of course, advertisements are necessary for most websites to survive, therefore you need to strive for the right balance between speed and income. If you optimize all other areas of your website design, a few advertisements will not be too damaging. Just be sure you are fully aware of what load each advertisement adds to your website by testing your website speed before and after adding the advertisement.

    8. Consider Not Using Official Social Media Buttons & Widgets

    For most website owners, social media traffic is second only to search engine traffic. Which is why social media sharing buttons are so prominent on website designs.
    Official sharing buttons are popular as they denote the number of shares a page has had. Unfortunately, official sharing buttons from services such as Facebook and Twitter can increase loading times immensely due to the calls they make to external services. I previously displayed sharing buttons above and below articles for Facebook, Google+ and Twitter. This added a whopping 500KB to my pages.
    By simply changing to text links or locally stored social media images, you could save reduce your page size by up to one megabyte.

    9. Enable Gzip Compression

    Gzip compression allows a website page to be transferred to a browser at up to 70% of its original size. The browser will then decompress the page and display it to the user.
    Gzip Compression
    Gzip compression is easy to enable in WordPress.
    Gzip can be enabled via the WordPress options page. You can find this page at www.yourwebsite.com/wp-admin/options.php. To enable Gzip, simply change the value of the Gzip field from 0 to 1.

    10. Minify and Combine CSS and Javascript

    Each call to your CSS and Javascript files is an HTTP request. This means that when someone visits your web page, their computer sends a request for a file and then the server sends it back. The more requests there are to your server, the longer it will take for your pages to load.
    The PHP5 application Minify combines multiple CSS and Javascript files into a single file. This greatly reduces the number of HTTP requests. The application also removes unnecessary whitespace and comments.
    There are a number of WordPress plugins available that will minify your CSS and Javascript files. I recommend using either WP Minify or Better WordPress Minify.

    11. Enable Browser Caching

    Some of the largest files on your website rarely change. This includes CSS files, Javascript files, your website logo etc. One way to take advantage of this is to enable browser caching.
    Browser caching allows internet users to speed up the loading time of their favourite websites by storing a cached copy of your website locally. This reduces calls to your server and saves the user from downloading the same files again.
    You can enable browser caching by adding the following code to your .htaccess file:
    ## EXPIRES CACHING ##
    <IfModule mod_expires.c>
    ExpiresActive On
    ExpiresByType image/jpg "access 1 year"
    ExpiresByType image/jpeg "access 1 year"
    ExpiresByType image/gif "access 1 year"
    ExpiresByType image/png "access 1 year"
    ExpiresByType text/css "access 1 month"
    ExpiresByType text/html "access 1 month"
    ExpiresByType application/pdf "access 1 month"
    ExpiresByType text/x-javascript "access 1 month"
    ExpiresByType application/x-shockwave-flash "access 1 month"
    ExpiresByType image/x-icon "access 1 year"
    ExpiresDefault "access 1 month"
    </IfModule>
    ## EXPIRES CACHING ##
    The code above specifies how long a particular file type should be stored. Files will simply be downloaded again if they have expired.
    12. Install a Cache Plugin

    Caching plugins allow you to publish static HTML files instead of dynamic files. This greatly reduces the time a page takes to load as there are no PHP or MySQL commands to execute.
    Additional caching features include minification, caching of feeds, Gzipping, Content Delivery Network (CDN) support, and much more.
    Caching your pages is one of the most effective ways of improving your page loading times, with many plugins promising an improvement of at least ten times. Popular caching plugins include WP Super Cache, W3 Total Cache and WP Fastest Cache. All three plugins are available free.
    W3 Total Cache
    W3 Total Cache is one of the most popular caching plugins available for WordPress.
    13. Use a Content Delivery Network

    Your website is hosted in a data center somewhere in the world. The further a visitor is from the location of your data center, the longer it takes for your web pages to load.
    Content Delivery Networks (CDN) address this issue by utilizing dozens of data centers around the world. They take the heavy work away from your hosting company by hosting your images, CSS and Javascript files, and serving these files to visitors from the closest location to them. Seconds can be taken away from your page loading times because of this.
    Popular content delivery networks include MaxCDN, Amazon CloudFront and CloudFlare. The cost of these services vary according to how much bandwidth your website uses. For example, MaxCDN’s cheapest plan costs $9 per month for 100GB of bandwidth.
    Overview

    Optimizing your website is no longer an option. With search engines placing so much importance on the speed of web pages, it is vital to your website’s success to have fast loading web pages.
    A lot of people wrongly assume that you need to be an expert to optimize a WordPress website. Nothing could be further from the truth. 99% of optimizing your website correctly is following good practices and taking advantage of caching and content delivery networks.
    I hope you have enjoyed this tutorial on optimization. If so, I encourage you to subscribe to the Elegant Themes blog so that you get updated about our latest articles
    #A3

    Free Responsive Magazin Wordpress Themes

    The7 - Responsive Multi-Purpose WordPress Theme v.2.1.3

    The7.2 is perfectly scalable, performance and SEO optimized, responsive, retina ready multipurpose WordPress theme. It will fit every site – big or small. From huge corporate portals to studio or personal sites – The7 will become a great foundation for your next project!
    DEMO

    DOWNLOAD
    • http://www65.zippyshare.com/v/QscHDWxR/file.html
    • http://www.solidfiles.com/d/ddf9d7fe03
    • http://turbobit.net/2b6qo86ojcwk.html
    • http://www.sharebeast.com/2116ljvrdqmh
    • http://www.speedyshare.com/file/5VTWc/the7.2_v.2.1.3.zip
    • https://uptobox.com/8sinhfn287gx
    • http://180upload.com/1cgerja8mj78
    • http://upx.nz/jGO9hn

    Avada - Responsive Multi-Purpose Theme v.3.8.4


     This multi-purpose WordPress theme sets the new standard with endless possibilities, top-notch support, and lifetime updates with newly requested features from our users.
     demo 

    DOWNLOAD
    • http://www48.zippyshare.com/v/RyJI6Fmz/file.html
    • http://ge.tt/95kyCTG2
    • http://www.gamefront.com/files/25007191/Avada_v.3.8.4.zip
    • http://turbobit.net/4um45bwldq3u.html
    • http://hugefiles.net/1o04eoihy9q1
    • http://www.solidfiles.com/d/0ad42d32ca
    • http://www.sendmyway.com/vfvv584apu68/Avada_v.3.8.4.zip.html
    • http://d01.megashares.com/dl/vIY5zHO/Avada_v.3.8.4.zip
    • http://www.sharebeast.com/141ichnususw
    • http://www.speedyshare.com/file/QHe9p/Avada_v.3.8.4.zip
    X - The Theme - ThemeForest WordPress v.3.2.3


    Stacks – X includes multiple unique designs inside of one powerful theme, and we refer to these designs as “Stacks.” There are currently four Stacks available in X, with more on the way.
    DEMO


    DOWNLOAD
    • http://www68.zippyshare.com/v/nJiCAzCk/file.html
    • http://www.sharebeast.com/1txwbfzx8o9v
    • http://upx.nz/8jM6Gq
    • http://ge.tt/8MU3dMG2
    • http://pion.rghost.net/6tVwCcCkF
    • http://www.solidfiles.com/d/521e731588
    • http://turbobit.net/3ec8f24t2i80.html
    • http://hugefiles.net/yj4brmzo3v8y
    • https://files.fm/u/lxbmhzq
    • http://www.sendmyway.com/296psnnudyu8/x_theme_v.3.2.3.zip.html

    BeTheme v.7.2 - Responsive Multi-Purpose WordPress Theme


    BeTheme is the best product we ever did. This is more than just WordPress theme. Such advanced options panel and Drag&Drop builder tool give unlimited possibilities. To show you how theme works, we have created 15 thematic websites so you can see how amazing this product is.

    DEMO

    DOWNLOAD:
    • http://www1.zippyshare.com/v/p9srQUWE/file.html
    • http://kaon.rghost.net/6cqVZK4n7
    • http://www.gamefront.com/files/24923489/betheme_v.7.2.zip
    • http://www.solidfiles.com/d/8668ad3505
    • http://turbobit.net/iag1h3953rzk.html
    • http://www.sendmyway.com/xdkjsldw2fro/betheme_v.7.2.zip.html
    • http://hugefiles.net/1aamksbpvdvi
    • https://netload.in/dateizCrxqgAtao/betheme_v.7.2.zip.htm
    • http://d01.megashares.com/dl/EXJBCGF/betheme_v.7.2.zip
    • http://www.sharebeast.com/sqlojslj0yq0
    • http://www.speedyshare.com/file/bB5kE/betheme_v.7.2.zip
    • http://upx.nz/ancbQo


    #A3

    Komentar Terbaru

    Just load it! //SEO SCRIPT POWERED BY www.legeeks.org